Integrating your passion for art with the adventure of hiking requires thoughtful preparation, especially when it comes to packing your supplies. The wilderness offers unparalleled inspiration, but it also presents unique challenges for safeguarding delicate tools and mediums. This guide will walk you through the essential steps to ensure your art equipment arrives intact and ready for creation on the trail.
1. Selecting Your Wilderness Art Kit: Less is More
The first and most critical step is to curate your art supplies. Hiking demands minimalism; every ounce and inch counts. Prioritize lightweight, compact, and multi-purpose items that can withstand varied environmental conditions. Consider the specific art you intend to create and the duration of your hike. A short day hike might allow for a small watercolor kit, while a multi-day trek necessitates even stricter selection.
1.1. Mediums for the Trail:
Sketching: Graphite pencils (2B, 4B, 6B are versatile), a small kneaded eraser, and a fine-tip permanent marker are excellent. Choose a compact sketchbook with durable covers.
Watercolors: Pans are superior to tubes for hiking due to less risk of leakage and lighter weight. A small set of travel pans (e.g., 12-24 colors), a water brush (refillable), and a small, absorbent sponge are ideal.
Colored Pencils/Pastels: Opt for a smaller selection of essential colors rather than full sets. Pastels are fragile; consider oil pastels for better durability.
Ink: A fountain pen with waterproof ink or a set of fine-line pens.
Digital: A lightweight tablet with a pressure-sensitive stylus can replace many physical items but requires battery management and robust protection.
1.2. Essential Tools & Surfaces:
Brushes: Select 2-3 synthetic brushes (round and flat) that can handle multiple mediums. Travel brushes with caps are highly recommended.
Water Container: A small, collapsible silicone cup or a repurposed plastic bottle for water (if not using a water brush).
Surfaces: A small, hardbound sketchbook or a pad of paper clipped to a rigid board. For watercolors, consider small blocks or a few sheets taped to a lightweight board. Avoid loose sheets that can blow away easily.
Cleaning Supplies: A small cloth, a few wet wipes, and a small, sealable trash bag for waste.
“When packing art supplies for the backcountry, think like a surgeon: only bring what’s absolutely necessary for the task at hand. Every item should earn its place in your pack by being essential, lightweight, and robust.” – Dr. Elias Thorne, Wilderness Artist & Ultralight Backpacker
No sugar noodles, Noodles, Noodle, Freshwater fish, Fish noodles, The young fish noodles, Garland chrysanthemum, How much tokens for, How leather chinese, Noodles, Noodles, Noodles, Garland chrysanthemum, Garland chrysanthemum, Garland chrysanthemum, Garland chrysanthemum, Garland chrysanthemum · Photo by buffetcrush on Pixabay
2. Protective Packing for Fragile Gear
Once you’ve chosen your supplies, the next challenge is ensuring they survive the journey. Bumps, moisture, and temperature fluctuations are common on the trail. Proper protection is paramount to prevent damage, spills, and loss.
2.1. Guarding Against Impact and Pressure:
Hard Cases & Pouches: Utilize sturdy, lightweight cases for items like watercolor pans, delicate brushes, or pastels. Small, padded camera pouches work well for digital tablets or compact camera gear used for reference photos.
Creative Padding: Wrap fragile items in soft cloths, socks, or even extra clothing. Position them strategically within your pack, cushioned by other gear, away from direct pressure points.
Sketchbook Protection: Keep sketchbooks and paper in a rigid folder or inside a waterproof document bag to prevent bending and moisture damage.
2.2. Preventing Leaks and Spills:
Sealable Containers: Any liquid mediums (e.g., ink, small tubes of paint if absolutely necessary) must be double-bagged in sturdy, zip-top freezer bags.
Water Brushes: Ensure water brushes are completely empty or have a secure cap to prevent accidental discharge.
Paint Tubes: If you must bring paint tubes, opt for small, travel-sized ones and ensure caps are tightly secured. Wrap them individually in a paper towel before bagging.
2.3. Organizing for Accessibility:
Use small, clear pouches or zippered bags to organize different categories of supplies (e.g., drawing tools in one, painting in another). This prevents rummaging and helps you quickly locate what you need without unpacking your entire backpack. Labeling these pouches can further enhance efficiency.
Key Takeaway: Thoughtful selection of lightweight, durable mediums and meticulous protective packing are crucial for art supplies to endure the rigors of hiking. Think compact, sealed, and cushioned.
3. Integrating Art Gear with Hiking Essentials
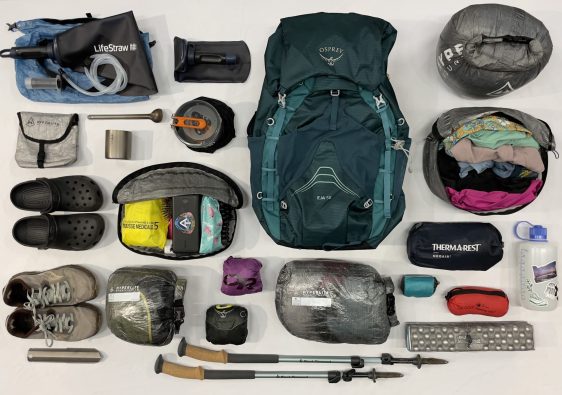
Packing art supplies is not isolated from packing your general hiking gear. It’s about finding harmony within your backpack, optimizing space, weight distribution, and accessibility. Your art kit should feel like a natural extension of your hiking essentials, not a cumbersome addition.
3.1. Weight and Balance:
Distribute Weight: Place heavier art items (e.g., a digital tablet, small paint block) close to your back, in the middle of your pack. Lighter, bulkier items (like a sketchbook) can go further from your back or in top compartments.
Assess Overall Load: Continuously evaluate the total weight of your pack. Art supplies should not compromise safety or comfort by making your pack excessively heavy.
3.2. Accessibility and Placement:
Quick-Draw Pouch: For items you’ll use frequently (e.g., a small sketchbook and pencil for quick sketches), keep them in an easily accessible top pocket or a hip belt pouch.
Main Compartment: Bulkier or less frequently used items can reside in the main compartment, protected by other soft gear.
External Pockets: Use side pockets for water bottles, or, if secure enough, a small, durable art case.
3.3. Environmental Considerations:
When selecting your gear, also consider its environmental impact. Choose eco-friendly options where possible and always practice Leave No Trace principles. This includes proper disposal of any art-related waste, like used paper towels or water from cleaning brushes, far from water sources and never directly into the wilderness.
Comparison of Common Art Mediums for Hiking
Medium
Weight/Bulk
Durability
Ease of Cleanup
Environmental Impact
Graphite/Charcoal
Low
High (except smudging)
Easy (dry)
Low
Watercolor (Pans)
Low
Medium (fragile pans)
Easy (water)
Low (natural pigments)
Oil Pastels
Medium
High
Medium (greasy)
Medium (synthetic binders)
Digital Tablet
Medium (plus power bank)
Medium (requires protection)
N/A (no physical cleanup)
Low (no physical waste)
Acrylics (Tubes)
High
Low (leak risk, dries fast)
Hard (requires water/soap)
High (plastic content)
“Your backpack is a dynamic ecosystem. Every item influences the others. Integrate your art supplies by understanding their weight, fragility, and how they interact with your sleeping bag, food, and emergency gear. It’s all about creating a harmonious load.” – Sarah Jenkins, Professional Adventure Photographer & Plein Air Painter
Key Takeaway: Art supplies must be integrated thoughtfully into your overall pack, balancing weight, accessibility, and environmental responsibility alongside your essential hiking gear.
4. Field Setup, Workflow, and Cleanup
Packing is only half the battle; knowing how to set up your portable studio, work efficiently, and leave no trace is equally vital for a rewarding experience.
4.1. Setting Up Your Wilderness Studio:
Choose Your Spot Wisely: Look for a flat, stable area protected from wind and direct sun (which can dry paints too quickly or cause glare on tablets). Avoid fragile vegetation or areas prone to erosion.
Minimalist Easel: For some, a lightweight tripod with a tablet clamp or a small lap desk might be suitable. Others will simply use their lap or a flat rock.
Prepare Your Surface: Have your paper or sketchbook ready. Clip down loose sheets to prevent them from flying away.
Water Management: If using watercolors, have your water brush or small water container ready. Only use a minimal amount of water and dispose of it responsibly (e.g., dilute and disperse far from water sources).
4.2. Efficient Workflow On-Site:
Work Quickly: Nature changes rapidly. Capture the essence of the scene or object without overthinking.
Layering: Start with broad strokes or light sketches, then add details.
Reference Photos: Don’t hesitate to take quick reference photos on your phone. They can help you finish details later or remember specific colors.
4.3. Leaving No Trace:
Pack It In, Pack It Out: This principle applies to all your art supplies. Every piece of paper, every paint wipe, every broken pencil lead must leave with you.
Water Disposal: If you use water for cleaning brushes, ensure it’s free of paint particles before dispersing. If heavily pigmented, pack it out in a sealed container.
Respect the Environment: Avoid disturbing wildlife, plants, or geological features while you work. Stay on designated trails and surfaces.
Clean Your Area: Before departing, double-check your immediate vicinity for any dropped items or debris.
Key Takeaway: Setting up efficiently, working deliberately, and rigorously adhering to Leave No Trace principles ensures your artistic pursuit enhances, rather than harms, the wilderness experience.
Frequently Asked Questions
What are the absolute lightest art supplies for backpacking?
For ultimate lightweight backpacking, consider a minimal sketch kit: a small, pocket-sized sketchbook, a single graphite pencil (e.g., a mechanical pencil), and a small kneaded eraser. For color, a tiny travel watercolor palette with a water brush is incredibly compact and light. Some artists opt solely for a small smartphone or tablet for digital sketching to eliminate physical supplies.
How can I prevent paint tubes from leaking in my pack?
The best way to prevent paint tubes from leaking is to avoid them altogether in favor of solid mediums like pan watercolors or watercolor pencils. If tubes are essential, choose small travel sizes, ensure caps are tightly secured, wrap each tube individually in a paper towel, and then place them inside a sturdy, double-sealed freezer bag. Storing them upright in a hard-sided container can also add an extra layer of protection.
Is it possible to bring a portable easel or stool on a hike?
Yes, but it depends on the type of hike and your tolerance for extra weight. Many ultralight hikers forgo easels entirely, using their lap or a flat rock. However, there are compact, lightweight travel easels or tripod attachments available that can hold a small board or tablet. Similarly, lightweight, collapsible camping stools are available, but they will add significant bulk and weight. For shorter, less strenuous hikes, these additions might be feasible, but for multi-day backcountry trips, they are generally considered luxury items to be weighed carefully against necessities.
Liam Vance is a certified divemaster, avid paraglider, and extreme sports journalist with over eight years of field experience. He has rafted grade-5 rapids across South America and logged hundreds of dives in tropical and cold-water ecosystems. At Adventure, Liam covers air and water sports, safety protocols, and gear performance in extreme environments.
About Author
Liam Vance is a certified divemaster, avid paraglider, and extreme sports journalist with over eight years of field experience. He has rafted grade-5 rapids across South America and logged hundreds of dives in tropical and cold-water ecosystems. At Adventure, Liam covers air and water sports, safety protocols, and gear performance in extreme environments.
 aktiv_admin